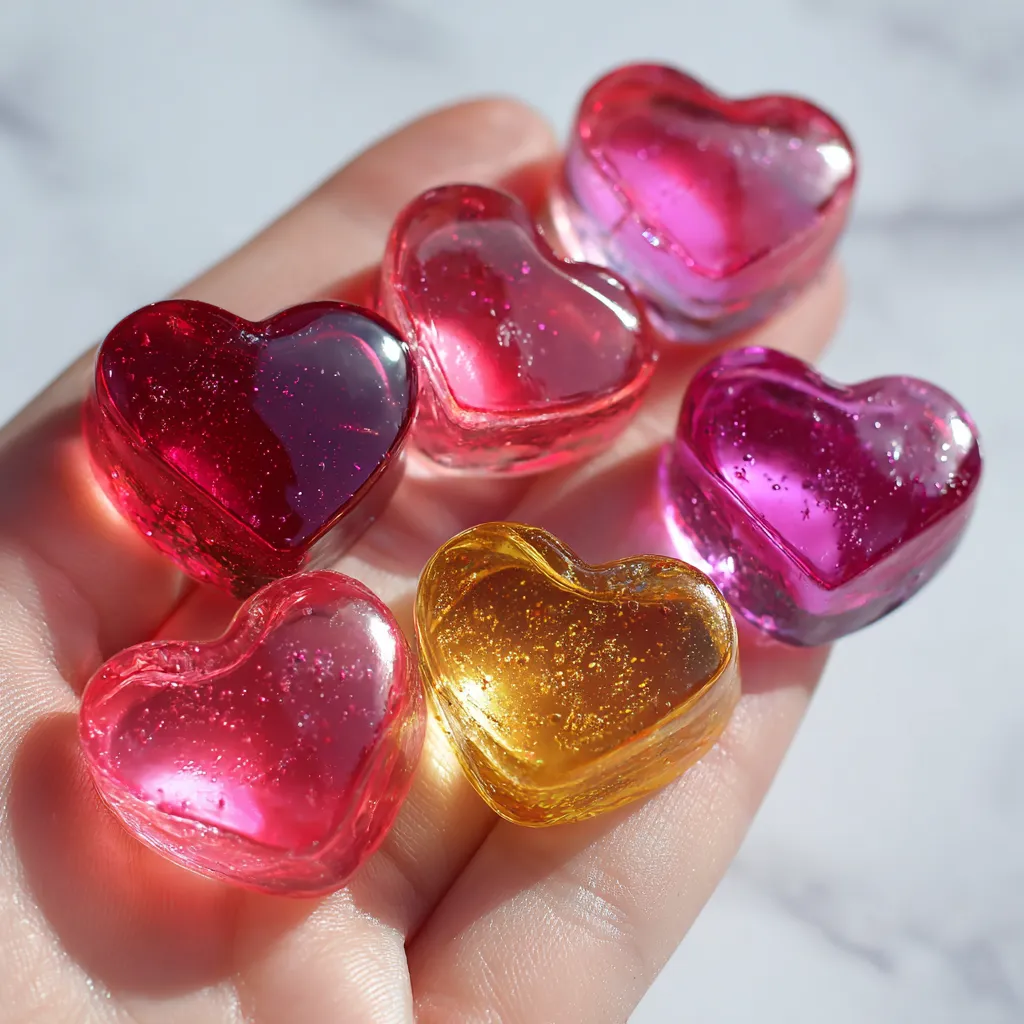
When it comes to fun, delicious, and creative homemade candies, nothing beats Heart Jelly Gummies. These sweet and chewy treats aren’t just tasty—they’re also adorable, versatile, and perfect for nearly any occasion. Whether you’re preparing a Valentine’s Day surprise, a homemade gift, or a playful dessert for kids, Heart Jelly Gummies add a touch of joy to the table.
Unlike store-bought gummies, making them at home gives you complete control over the flavors, colors, and ingredients. You can make them healthier by using real fruit juice, reduce added sugar, or go all out with bright colors and fun flavors.
In this ultimate guide, we’ll cover everything you need to know: from ingredients and tools to step-by-step instructions, variations, storage tips, nutritional value, and serving ideas. By the end, you’ll be ready to whip up your own batch of delicious Heart Jelly Gummies that will impress both kids and adults alike.
Why Choose Homemade Heart Jelly Gummies?
Homemade gummies may seem like extra work, but they come with a lot of benefits:
-
Customizable Flavors – You choose your favorite juices, extracts, or flavorings.
-
Healthier Ingredients – Reduce sugar, use natural fruit juices, or add vitamins.
-
Fun for Kids – A creative cooking project the whole family can enjoy together.
-
Perfect Gifts – Package them in jars or boxes for holidays, birthdays, or party favors.
-
Festive Shapes – Heart molds make them perfect for Valentine’s Day, weddings, anniversaries, and even baby showers.
Ingredients for Heart Jelly Gummies
Here’s what you’ll need to make a standard batch of Heart Jelly Gummies:
-
2 cups fruit juice (cranberry, strawberry, raspberry, or any flavor you love)
-
1/4 cup granulated sugar (optional, adjust for sweetness)
-
3–4 tablespoons unflavored gelatin (creates that chewy gummy texture)
-
1 tablespoon lemon juice (brightens flavor)
-
1–2 drops food coloring (optional, for vibrant color)
-
Nonstick cooking spray or a little oil (to prevent sticking in molds)
Optional Add-ins:
-
Honey or agave syrup (for natural sweetness)
-
Vitamin C powder (for a nutritional boost)
-
Fruit puree (for thicker, more natural gummies)
Kitchen Tools You’ll Need
-
Small saucepan
-
Whisk
-
Silicone heart-shaped molds (these make your gummies adorable!)
-
Dropper or spoon for filling molds
-
Airtight container for storage
Step-by-Step Instructions
Step 1: Prepare the Molds
Lightly grease your silicone heart molds with a thin coat of cooking spray or oil. This ensures your gummies pop out smoothly without breaking.
Step 2: Bloom the Gelatin
Pour your fruit juice into a saucepan and sprinkle gelatin evenly over the top. Let it sit for 2–3 minutes so the gelatin can “bloom,” meaning it absorbs liquid and starts dissolving.
Step 3: Heat and Sweeten
Place the saucepan over low heat. Gently whisk until the gelatin is fully dissolved—avoid boiling as it can ruin the texture. Stir in sugar, honey, or your chosen sweetener until fully dissolved.
Step 4: Add Lemon Juice and Color
For a brighter, fresher taste, stir in the lemon juice. If desired, add a few drops of food coloring to enhance the look of your gummies.
Step 5: Pour Into Molds
Using a spoon or dropper, carefully transfer the liquid mixture into your heart molds. Work quickly before the mixture begins to set.
Step 6: Chill and Set
Refrigerate the molds for at least 2–3 hours, or until the gummies are firm.
Step 7: Remove and Enjoy
Once set, gently pop the Heart Jelly Gummies out of the molds. Store in an airtight container in the fridge for up to 1 week.
Flavor Variations for Heart Jelly Gummies
One of the best parts of this recipe is its flexibility. Try these creative twists:
-
Berry Bliss – Use a mix of strawberry and raspberry juice for a fruity explosion.
-
Citrus Love – Combine orange and lemon juice for a tangy twist.
-
Tropical Hearts – Try pineapple or mango juice for a refreshing summer gummy.
-
Layered Gummies – Make two batches in different colors and layer them for a fun look.
-
Spiced Romance – Add a pinch of cinnamon or ginger for a warming flavor.
Helpful Tips for Perfect Gummies
-
Use Silicone Molds – They make removal easier and come in fun shapes.
-
Don’t Overheat – Boiling gelatin can prevent proper setting.
-
Adjust Sweetness – Start with less sugar, taste, and add more if needed.
-
Make Them Vegan – Replace gelatin with agar-agar (though texture will be slightly different).
-
Longer Chill Time – For firmer gummies, let them sit overnight.
Storing Heart Jelly Gummies
-
Fridge Storage – Keep them in an airtight container for up to 7 days.
-
Room Temperature – Not recommended, as gelatin melts in warm conditions.
-
Freezing – Avoid freezing; it ruins the texture.
Nutritional Value (Approx. per Serving – 4–5 Gummies)
-
Calories: 60
-
Carbohydrates: 13 g
-
Sugars: 11 g
-
Protein: 2 g (from gelatin)
-
Fat: 0 g
-
Vitamin C: 15–20% DV (if made with citrus juice)
Serving Ideas for Heart Jelly Gummies
-
Valentine’s Day Gift Bags – Package in decorative bags with ribbons.
-
Kids’ Party Treats – A healthier alternative to store-bought candy.
-
Wedding or Baby Shower Favors – Elegant and thoughtful homemade goodies.
-
Lunchbox Surprise – Add a couple to kids’ lunchboxes for a fun snack.
-
Dessert Garnish – Use as decoration on cakes, cupcakes, or parfaits.
Why This Recipe is SEO-Friendly
Using the keyword Heart Jelly Gummies throughout ensures your blog post is optimized for search engines. By incorporating variations like “homemade gummies,” “Valentine’s gummy candy,” and “DIY fruit gummies,” you expand keyword reach while keeping the content natural and engaging.
Conclusion
Making Heart Jelly Gummies at home is easier than you think, and the results are worth it. With just a handful of ingredients, some heart-shaped molds, and a little patience, you can create a delightful treat that’s both visually stunning and delicious. Perfect for special occasions or everyday fun, these gummies are a sweet way to show love.