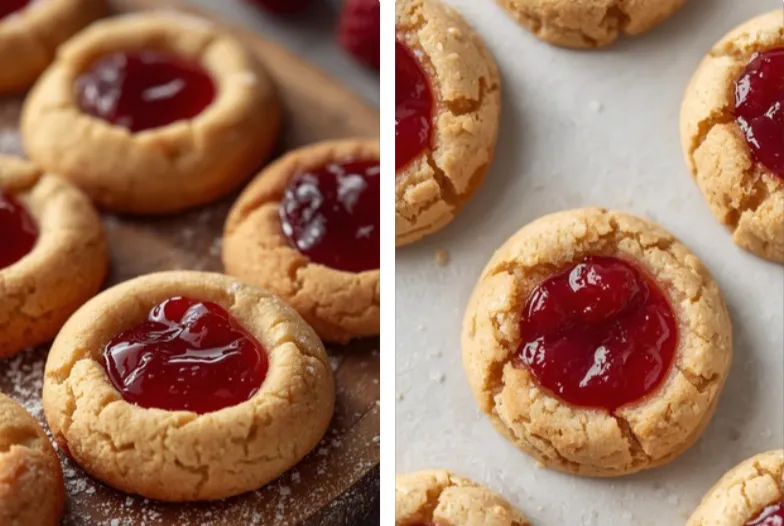
There’s something deeply nostalgic about a tray of golden, buttery thumbprint cookies cooling on the counter. Their tender crumb, glossy jam center, and delicate sweetness make them the kind of treat that feels like home — simple, comforting, and endlessly adaptable.
Whether you’re baking for a cozy Sunday afternoon, a festive cookie swap, or a thoughtful homemade gift, thumbprint cookies with jam are a true crowd-pleaser. Their beauty lies not only in their taste but also in their versatility — every batch can be customized with your favorite jams, nut coatings, or even chocolate fillings.
In this guide, we’ll explore everything you need to know about making perfect thumbprint cookies:
-
The history and meaning behind this beloved treat
-
How to achieve that soft, buttery texture
-
The best jams and fillings to use
-
Creative twists on the traditional recipe
-
Storage tips, troubleshooting, and expert baking secrets
By the end, you’ll be ready to bake a batch of cookies that not only taste amazing but also look stunning enough to share on your Pinterest feed or dessert table.
1. The Story Behind Thumbprint Cookies
The origins of thumbprint cookies (also known as hallongrotta in Sweden, meaning “raspberry cave”) date back centuries. Swedish bakers are believed to have popularized these charming cookies, traditionally filled with raspberry jam and served during the holidays.
From Scandinavia, the recipe traveled across Europe and eventually to North America, where it evolved into many regional variations — some rolled in nuts, others filled with chocolate or caramel, and some even drizzled with glaze after baking.
Despite their simplicity, these cookies carry an emotional weight — often made by hand, pressed with a thumb (or sometimes the back of a spoon), and filled with jam that reflects the baker’s personal touch.
2. Ingredients for the Perfect Thumbprint Cookies
A great cookie begins with high-quality ingredients. Here’s what you’ll need to create that irresistible buttery texture and balanced sweetness:
Base Ingredients:
-
1 cup (230g) unsalted butter, softened
-
2/3 cup (135g) granulated sugar
-
1 large egg yolk
-
1 teaspoon vanilla extract
-
2 cups (250g) all-purpose flour
-
1/4 teaspoon salt
Filling:
-
1/2 cup fruit jam or preserves (raspberry, strawberry, apricot, or your favorite)
Optional Add-Ons:
-
Finely chopped nuts (pecans, almonds, or hazelnuts) for rolling
-
Powdered sugar for dusting after baking
-
Lemon zest or almond extract for extra flavor
3. Step-by-Step Instructions for Baking Success
Follow these easy steps to create cookies that are golden, tender, and picture-perfect every time.
1: Cream the Butter and Sugar
In a large bowl, beat the butter and sugar together until light and fluffy. This aeration step is key — it gives the cookies their melt-in-your-mouth texture.
2: Add Egg Yolk and Vanilla
Mix in the egg yolk and vanilla extract until just combined. The yolk adds richness and helps bind the dough.
3: Combine Dry Ingredients
In another bowl, whisk together flour and salt. Gradually add this mixture to the wet ingredients until a soft dough forms. Don’t overmix.
4: Chill the Dough
Cover and refrigerate the dough for at least 30 minutes. Chilling prevents the cookies from spreading too much in the oven.
5: Shape the Cookies
Roll the dough into 1-inch balls. If desired, roll each ball in chopped nuts for texture and flavor. Place on a parchment-lined baking sheet.
6: Create the “Thumbprint”
Press the center of each dough ball gently with your thumb (or the back of a teaspoon). This will create the perfect well for the jam.
7: Fill with Jam
Spoon about 1/2 teaspoon of jam into each indentation. Avoid overfilling — jam can bubble over while baking.
8: Bake
Bake in a preheated oven at 350°F (175°C) for 12–15 minutes, or until the edges are lightly golden.
9: Cool and Enjoy
Allow cookies to cool completely on a wire rack before storing. Dust with powdered sugar if desired.
4. Choosing the Perfect Jam
The filling can completely transform your thumbprint cookies. Here are some of the most popular (and Pinterest-worthy) options:
| Type of Jam | Flavor Notes | Best Pairing |
|---|---|---|
| Raspberry Jam | Tart and fruity | Classic holiday cookies |
| Strawberry Jam | Sweet and nostalgic | Perfect for Valentine’s Day |
| Apricot Jam | Bright and tangy | Great for springtime |
| Blueberry Preserves | Deep, sweet, and rich | Elegant brunch treats |
| Fig Jam | Sophisticated, earthy | Perfect for adult palates |
| Mixed Berry Jam | Complex and vibrant | Great for gifting |
5. Flavor Variations You’ll Love
Once you’ve mastered the classic recipe, get creative!
Chocolate Lovers
Fill the thumbprints with chocolate ganache instead of jam. Add a sprinkle of sea salt for a gourmet touch.
Nutty Delight
Roll cookies in finely chopped nuts (like almonds or pecans) before baking for added crunch and flavor.
Citrus Burst
Add lemon zest to the dough and fill with lemon curd for a zesty twist.
Herbal Elegance
Try lavender-infused jam or rosemary-honey filling for a refined, modern version.
Holiday Spice
Mix a pinch of cinnamon or nutmeg into the dough and use cranberry jam for a cozy Christmas feel.
6. Troubleshooting Common Mistakes
| Problem | Likely Cause | Quick Fix |
|---|---|---|
| Cookies spread too much | Dough too warm | Chill before baking |
| Cracks around edges | Pressed too deep or dough too dry | Slightly underfill and soften dough with a touch of butter |
| Jam overflowed | Overfilled centers | Use less jam or thicker preserves |
| Cookies dry or crumbly | Overbaked | Bake until edges just turn golden |
Remember: Small imperfections are part of the charm — they show your cookies are handmade!
7. Storing and Freezing Thumbprint Cookies
These cookies store beautifully and make perfect gifts.
-
Room Temperature: Store in an airtight container for up to 5 days.
-
Refrigerator: Extend freshness up to 2 weeks.
-
Freezer: Freeze baked cookies (without jam) for up to 3 months. Add jam after thawing for the best texture.
If gifting, wrap them in parchment paper and tie with a rustic ribbon for a homemade touch that’s Instagram and Pinterest ready!
8. Why These Cookies Are Perfect for Pinterest
If you’re a food blogger or creator, thumbprint cookies are an excellent visual recipe for Pinterest.
They photograph beautifully — vibrant jam centers pop against a neutral cookie base, creating contrast and texture that attract attention in feeds.
Here’s how to make your pins stand out:
-
Use natural light to highlight the jam’s shine.
-
Add props like linen napkins, wooden boards, or fresh fruit for warmth.
-
Create close-up shots showing the glossy jam and buttery crumb.
-
Use text overlays with keywords: “Easy Thumbprint Cookies,” “Classic Jam Cookies,” etc.
Pinterest thrives on seasonal content, so promote your pins heavily during:
-
Christmas
-
Valentine’s Day
-
Mother’s Day
-
Brunch season (spring)
9. Nutritional Information (Approximate per Cookie)
| Nutrient | Amount |
|---|---|
| Calories | 95 |
| Fat | 5g |
| Carbohydrates | 12g |
| Sugar | 6g |
| Protein | 1g |
These are estimates and can vary depending on jam type and portion size.
10. Final Thoughts: A Cookie That Connects Generations
From Scandinavian kitchens to Pinterest feeds around the world, thumbprint cookies with jam have stood the test of time. They embody everything we love about homemade baking — simplicity, comfort, and a touch of creativity.