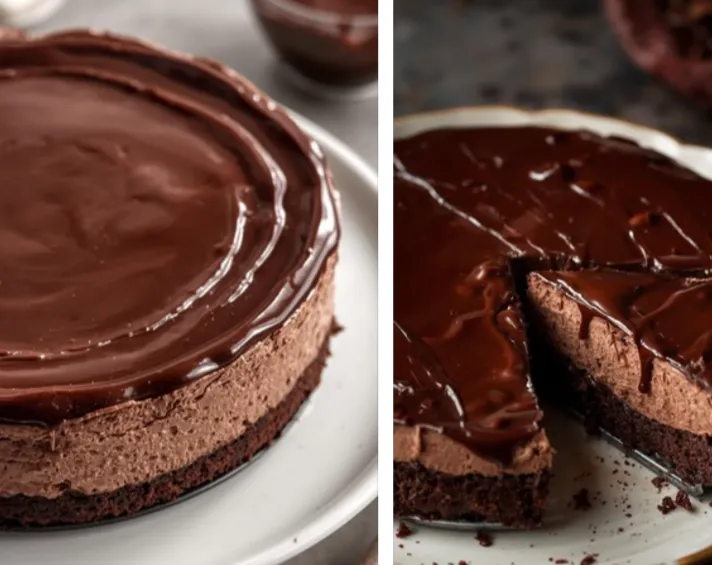
When it comes to desserts that blend pure indulgence with effortless preparation, nothing compares to a No-Bake Chocolate Cheesecake. This dessert is rich, smooth, and irresistibly chocolaty, yet surprisingly simple to make—no oven, no stress, and absolutely no compromise on flavor.
In this complete guide, we’ll explore how to create the perfect no-bake chocolate cheesecake, from the base to the topping, with professional tips to ensure a flawless texture every single time. We’ll also discuss ingredient variations, presentation ideas, make-ahead strategies, and expert troubleshooting to help you craft a masterpiece that will impress everyone at your table.
1. Why You’ll Love This No-Bake Chocolate Cheesecake
Unlike traditional cheesecakes that require precise baking and careful monitoring to avoid cracks, this no-bake version is entirely stress-free. It’s made with simple ingredients—cream cheese, melted chocolate, sugar, whipped cream, and a buttery biscuit crust—that come together to form a creamy, decadent dessert.
Here’s why this recipe is a must-try:
-
No oven required: Perfect for hot days or busy schedules.
-
Rich chocolate flavor: Deep cocoa taste with a smooth, mousse-like texture.
-
Customizable: Add layers, toppings, or mix-ins to suit any occasion.
-
Great for parties: Can be prepared ahead of time and stored in the fridge.
-
Crowd-pleaser: Everyone loves a silky, chocolatey cheesecake.
This dessert combines the best of both worlds: the creamy luxury of cheesecake and the intensity of fine chocolate—all without ever turning on your oven.
2. The Secret to a Perfect No-Bake Cheesecake Texture
The magic of a no-bake cheesecake lies in balance—the right ratio of cream cheese to whipped cream and chocolate. The chocolate provides structure as it sets, while the whipped cream adds airiness and volume.
To achieve the perfect texture, follow these golden rules:
-
Use room-temperature cream cheese.
Cold cream cheese leads to lumps, while softened cheese blends smoothly with other ingredients. -
Whip your cream to stiff peaks.
This gives the cheesecake its light, mousse-like consistency without collapsing. -
Fold gently.
Incorporate whipped cream into the chocolate-cream cheese mixture slowly to keep the air trapped inside. -
Chill for at least 6 hours.
The chilling process is crucial. It allows the mixture to firm up and develop its creamy texture. -
Don’t skip the melted chocolate.
It’s what helps the cheesecake set and gives it that unmistakable chocolate depth.
3. Ingredients You’ll Need
For the Crust:
-
250 g (about 2 cups) chocolate biscuits (such as Oreos or Digestive cookies)
-
100 g (7 tbsp) unsalted butter, melted
the Filling:
-
400 g (14 oz) cream cheese, softened
-
250 g (9 oz) dark or semi-sweet chocolate, melted and cooled slightly
-
1 cup powdered sugar
-
1 tsp vanilla extract
-
300 ml (1¼ cups) heavy cream, whipped to stiff peaks
-
Pinch of salt
Optional Toppings:
-
Shaved chocolate
-
Whipped cream
-
Chocolate ganache drizzle
-
Cocoa powder or chocolate curls
Each ingredient plays an essential role. The butter binds the crust; the cream cheese provides body; the chocolate gives flavor and firmness; and the whipped cream creates that airy, melt-in-your-mouth consistency.
4. Step-by-Step Instructions
1: Prepare the Crust
-
Crush the chocolate biscuits into fine crumbs using a food processor or rolling pin.
-
Combine with melted butter until evenly coated.
-
Press the mixture firmly into the bottom of a 9-inch springform pan.
-
Chill in the fridge for at least 30 minutes to set.
2: Make the Chocolate Filling
-
Melt the chocolate gently using a double boiler or microwave (in short bursts). Let it cool slightly.
-
In a large bowl, beat the softened cream cheese and powdered sugar until smooth and creamy.
-
Add vanilla extract and salt.
-
Slowly pour in the melted chocolate and mix until fully combined.
-
Fold in the whipped cream using a spatula—gently but thoroughly. This step determines how airy and creamy your cheesecake will be.
3: Assemble the Cheesecake
-
Spoon the chocolate filling over the prepared crust.
-
Smooth the top with a spatula or the back of a spoon.
-
Cover with plastic wrap and refrigerate for at least 6 hours (overnight for best results).
4: Add Toppings and Serve
-
Before serving, top your cheesecake with chocolate curls, whipped cream, or ganache.
-
Slice using a warm knife for clean edges.
-
Serve chilled and enjoy every creamy bite.
5. Variations and Creative Twists
One of the best things about this recipe is how easily it adapts to your taste or occasion. Here are a few delicious variations to try:
5.1. White Chocolate Cheesecake
Swap the dark chocolate for white chocolate and add a handful of raspberries or lemon zest for a fruity twist.
5.2. Mocha Cheesecake
Add 1 tablespoon of instant coffee to the melted chocolate to create a mocha-inspired flavor.
5.3. Peanut Butter Chocolate Cheesecake
Stir 2 tablespoons of peanut butter into the chocolate mixture for a rich, nutty flavor.
5.4. Mint Chocolate Cheesecake
Add ½ teaspoon of peppermint extract and top with crushed mint candies.
5.5. Layered Cheesecake
Create two layers—one chocolate and one vanilla or caramel—for a beautiful marbled effect.
6. Expert Tips for Success
-
Use quality chocolate. The final taste depends heavily on your chocolate. Choose high-quality bars over chocolate chips if possible.
-
Avoid overmixing. Too much mixing after folding in whipped cream can deflate the filling.
-
Line your pan with parchment. It makes removal easier and keeps the edges neat.
-
Let it chill completely. Patience is key—the longer it chills, the firmer and creamier it becomes.
-
Warm your knife before slicing. Run it under hot water and dry before cutting for perfect, clean slices.
7. Storing and Freezing Instructions
This cheesecake keeps beautifully when stored properly.
-
In the fridge: Store covered for up to 5 days.
-
In the freezer: Freeze slices individually wrapped for up to 2 months. Thaw overnight in the refrigerator before serving.
Tip: If you plan to freeze, skip fresh fruit toppings and add them after thawing.
8. How to Serve It Perfectly
Presentation matters—especially when you’re making a no-bake dessert that looks as luxurious as it tastes. Try these serving ideas:
-
Add a glossy ganache drizzle for a bakery-style finish.
-
Dust with cocoa powder for a minimalist look.
-
Garnish with berries (raspberries or strawberries work best).
-
Serve with espresso or a light dessert wine to balance the richness.
For dinner parties, serve small slices with fresh whipped cream. For birthdays, decorate with chocolate shards or truffles for a showstopping centerpiece.
9. Healthier Ingredient Alternatives
While no-bake cheesecakes are indulgent, small swaps can make them lighter:
-
Use Greek yogurt instead of part of the cream cheese.
-
Choose dark chocolate (70% cocoa) for less sugar and richer flavor.
-
Opt for low-fat cream cheese to reduce calories.
-
Substitute coconut oil for butter in the crust.
-
Use maple syrup or honey instead of powdered sugar.
These adjustments can create a guilt-free version that’s still luscious and satisfying.
10. Troubleshooting Common Issues
Even simple desserts can have challenges. Here’s how to fix or avoid common mistakes:
| Problem | Cause | Solution |
|---|---|---|
| Cheesecake not setting | Not enough chilling time | Chill for at least 6–8 hours or overnight |
| Lumpy filling | Cold cream cheese | Ensure cream cheese is fully softened |
| Crumbly crust | Too little butter | Add 1–2 extra tablespoons of melted butter |
| Overly sweet | Low-quality chocolate or too much sugar | Use dark chocolate and reduce sugar slightly |
| Watery texture | Overmixing or underwhipping cream | Whip cream to stiff peaks and fold gently |
With practice, you’ll find this recipe practically foolproof.
11. Why No-Bake Cheesecakes Are Trending
No-bake cheesecakes have taken over Pinterest and Instagram for good reason. They combine convenience, beauty, and indulgence in one dessert.
Modern home cooks appreciate how quickly they can create something luxurious without complicated baking steps. They’re also ideal for warmer months or when your oven is busy baking other dishes during holidays.
Plus, they photograph beautifully—making them perfect for food blogs, Pinterest boards, or digital recipe collections.
12. Pairing Ideas: What Goes Well with Chocolate Cheesecake
A slice of no-bake chocolate cheesecake is already divine, but it can shine even more with the right pairings:
-
Fresh raspberries or cherries: Add brightness and acidity.
-
Espresso or coffee: Balances the richness.
-
Salted caramel drizzle: Enhances the deep cocoa flavor.
-
Toasted nuts: Adds crunch and contrast.
-
Vanilla whipped cream: Adds a light, creamy finish.
13. Make-Ahead and Hosting Tips
If you’re entertaining guests, this dessert is your secret weapon. Here’s how to plan ahead:
-
Prepare the cheesecake 1–2 days in advance.
-
Store it covered in the fridge until ready to serve.
-
Add toppings right before serving to keep them fresh.
-
Slice before the event and refrigerate slices for easy plating.
This make-ahead flexibility makes it perfect for dinner parties, birthdays, or festive celebrations.
14. Nutritional Overview (per slice, approx. 1/12 of cheesecake)
| Nutrient | Amount |
|---|---|
| Calories | ~410 kcal |
| Fat | 32 g |
| Carbohydrates | 25 g |
| Protein | 6 g |
| Sugar | 19 g |
| Fiber | 2 g |
Note: Values vary depending on ingredients used, but this gives a general idea of portion moderation for those tracking macros.
15. Final Thoughts: Why This Recipe Deserves a Spot in Your Collection
A No-Bake Chocolate Cheesecake isn’t just another dessert—it’s a culinary confidence booster. It proves that you don’t need complicated baking skills to create a showstopping dessert that looks and tastes like it came from a professional patisserie.