There’s something timeless and indulgent about a cheesecake. It’s rich, creamy, and perfectly sweet — a dessert that feels both sophisticated and comforting. But what if you could enjoy all that decadence without ever turning on your oven?
That’s where the No-Bake White Chocolate Cheesecake comes in — a dessert that’s both elegant and effortless, ideal for holidays, dinner parties, birthdays, or quiet nights when you crave something special.
In this post, we’ll explore every detail you need to make the perfect no-bake white chocolate cheesecake — from the buttery base to the silky filling and creative topping ideas. You’ll also learn expert tips, flavor variations, and ways to store and serve it like a pro.
Why You’ll Love This Recipe
This no-bake white chocolate cheesecake is the kind of dessert that looks like you spent hours making it — yet it’s astonishingly easy. Here’s why people fall in love with it:
-
No baking required: Forget about cracking or overbaking. This recipe sets beautifully in the fridge.
-
Rich yet light: White chocolate adds a velvety texture and sweetness without heaviness.
-
Versatile base: You can use classic graham crackers, digestive biscuits, or even Oreos for a twist.
-
Make-ahead friendly: It’s even better when chilled overnight, making it perfect for entertaining.
-
Customizable: Add fruit, sauces, or nuts — this cheesecake is a blank canvas for creativity.
Ingredients You’ll Need
Before diving into the method, let’s make sure you have everything ready. Here’s a breakdown of what goes into a perfect No-Bake White Chocolate Cheesecake.
For the Crust:
-
200 g (about 2 cups) crushed digestive biscuits or graham crackers
-
100 g (1/2 cup) unsalted butter, melted
-
1 tablespoon granulated sugar (optional, for extra crunch)
For the Cheesecake Filling:
-
300 g (10 oz) white chocolate, high quality
-
500 g (2 cups) cream cheese, room temperature
-
250 ml (1 cup) heavy cream, chilled
-
100 g (1/2 cup) powdered sugar
-
1 teaspoon pure vanilla extract
-
Pinch of salt (balances sweetness)
Optional Toppings:
-
White chocolate curls or shavings
-
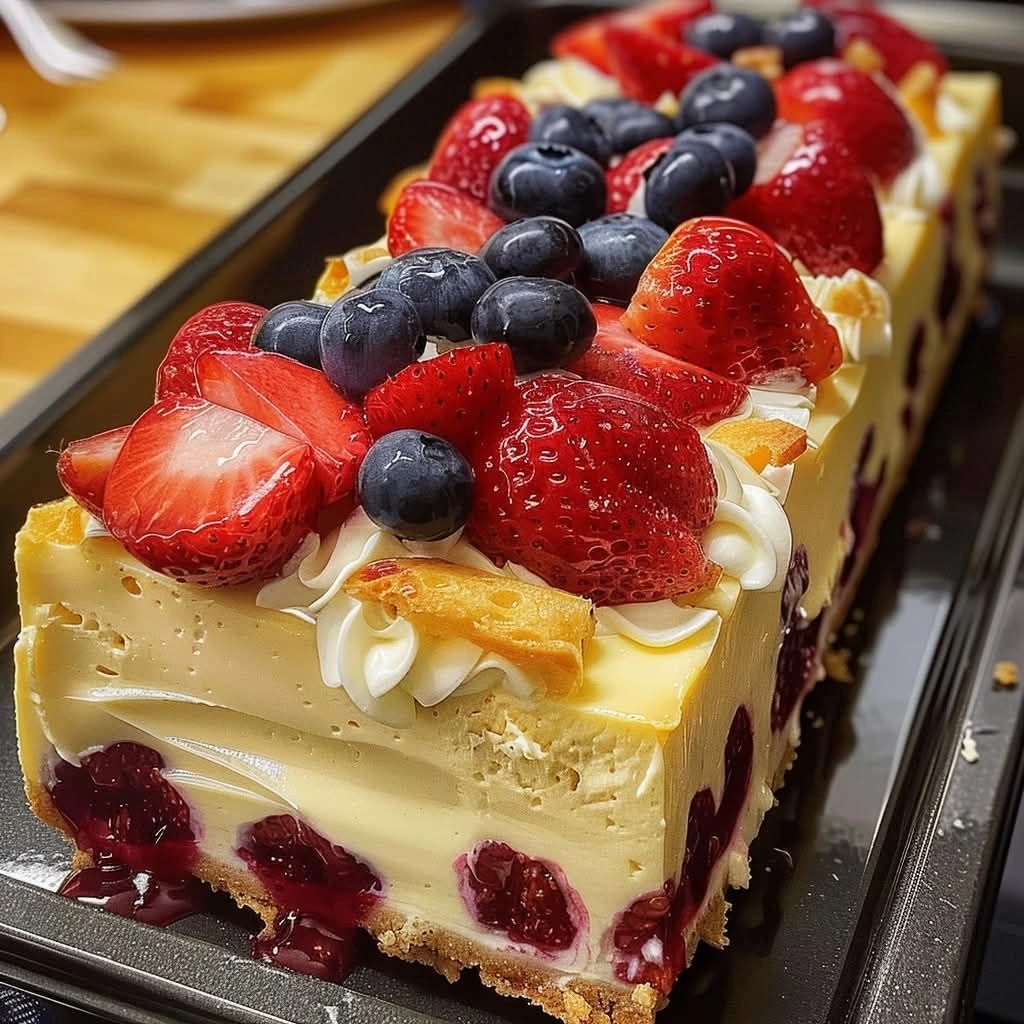
Fresh raspberries, strawberries, or blueberries
-
Raspberry coulis or fruit compote
-
Whipped cream swirls
-
Toasted coconut flakes or crushed nuts for texture
Step-by-Step Instructions
Step 1: Prepare the Crust
-
In a large bowl, mix the crushed biscuits with melted butter and sugar.
-
Stir until the crumbs are evenly coated and resemble wet sand.
-
Press the mixture firmly into the bottom of a 9-inch (23 cm) springform pan.
-
Use the back of a spoon or a glass to smooth and compact the surface.
-
Chill in the refrigerator for at least 20–30 minutes while you make the filling.
Pro Tip: For a chocolate twist, replace 25% of the biscuit crumbs with cocoa powder or use chocolate cookies instead.
Step 2: Melt the White Chocolate
-
Chop the white chocolate into small pieces.
-
Melt gently using a double boiler or microwave in 20-second intervals, stirring between each.
-
Allow it to cool slightly — it should be smooth and warm, not hot, when added to the filling.
Note: Always use high-quality white chocolate. Cheap varieties may seize or separate when melted.
Step 3: Whip the Cream
-
In a chilled mixing bowl, whip the heavy cream until soft peaks form.
-
Be careful not to overwhip — it should be smooth and fluffy, not grainy.
-
Set aside in the refrigerator.
Step 4: Make the Cheesecake Filling
-
In a large mixing bowl, beat the cream cheese with powdered sugar, vanilla, and salt until creamy and smooth.
-
Slowly pour in the melted white chocolate while mixing continuously at low speed.
-
Gently fold in the whipped cream using a spatula until well combined and airy.
You should now have a silky, thick filling that holds its shape but feels light and creamy.
Step 5: Assemble the Cheesecake
-
Remove the chilled crust from the refrigerator.
-
Spoon the cheesecake mixture onto the crust, spreading it evenly with a spatula.
-
Smooth the top and tap the pan lightly on the counter to remove air bubbles.
-
Cover with plastic wrap and refrigerate for at least 6 hours, ideally overnight, for the best texture.
Step 6: Garnish and Serve
Once the cheesecake is fully set:
-
Run a warm knife around the edges before releasing the springform pan.
-
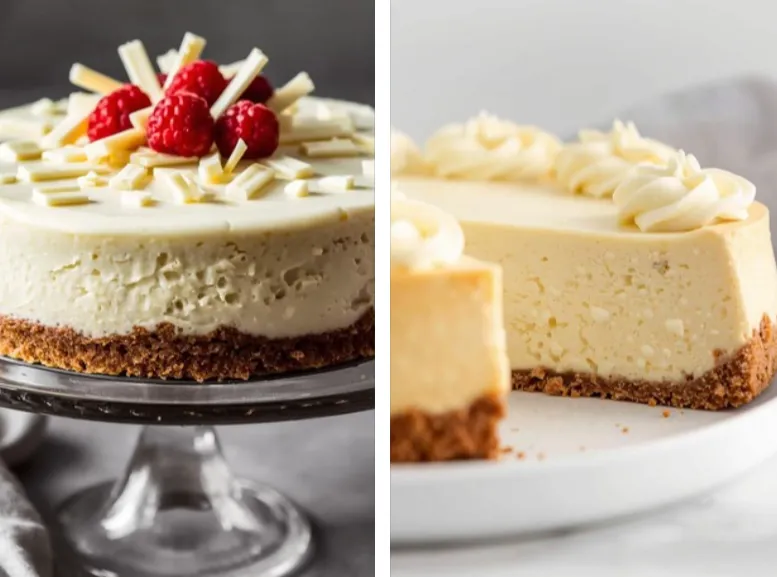
Decorate the top with white chocolate shavings, berries, or whipped cream.
-
Slice with a hot, clean knife for perfect presentation.
Tips for the Perfect No-Bake Cheesecake
-
Use full-fat cream cheese: Low-fat varieties tend to make the mixture too soft.
-
Avoid overmixing: Overbeating the filling can cause it to lose volume or turn runny.
-
Chill long enough: A minimum of 6 hours is crucial; 8–12 hours gives the best consistency.
-
Stabilize the cream: If your cream doesn’t whip easily, add a teaspoon of powdered gelatin dissolved in warm water for extra firmness.
-
Cut clean slices: Dip your knife in hot water, wipe, and repeat between cuts for neat presentation.
Flavor Variations to Try
Once you master the base recipe, you can easily adapt it for different flavors and occasions.
1. White Chocolate Raspberry Cheesecake
Add a layer of raspberry puree between the crust and filling, then swirl some on top for a marbled look. The tartness balances the sweetness beautifully.
2. Lemon White Chocolate Cheesecake
Add the zest and juice of one lemon to the filling. The citrus note cuts through the richness and makes it refreshing.
3. Cookies and Cream White Chocolate Cheesecake
Fold crushed Oreo cookies into the mixture before chilling for a crunchy, nostalgic twist.
4. Salted Caramel White Chocolate Cheesecake
Top with homemade or store-bought salted caramel sauce and a sprinkle of sea salt flakes for gourmet appeal.
5. Festive White Chocolate Cheesecake
Top with sugared cranberries, pomegranate seeds, or edible gold flakes for Christmas or New Year celebrations.
How to Store Your Cheesecake
-
Refrigerator: Keeps fresh for up to 4–5 days when covered tightly.
-
Freezer: Freeze slices for up to 2 months. Wrap each piece in cling film and place in an airtight container. Thaw overnight in the fridge before serving.
-
Avoid room temperature: The cheesecake softens quickly, so keep it chilled until ready to serve.
Common Mistakes to Avoid
Even though it’s a no-bake recipe, a few small mistakes can affect the texture or flavor. Here’s how to avoid them:
-
Adding hot chocolate to the filling: Always cool it slightly before combining.
-
Using low-quality chocolate: It can cause separation or grainy texture.
-
Skipping the chill time: The filling won’t set properly and may collapse when sliced.
-
Using warm cream cheese: Always use room temperature cream cheese for smooth blending.
-
Overmixing after adding cream: It can deflate the air and make the cheesecake dense.
Pairing Ideas
Pair this cheesecake with drinks or sides that complement its richness:
-
Coffee or espresso: Balances the sweetness perfectly.
-
Champagne or sparkling wine: Adds a festive touch.
-
Raspberry compote or lemon curd: Brightens the flavor profile.
-
Shortbread cookies or biscotti: Great for serving alongside.
Nutrition Information (Approx. per Slice)
| Component | Amount |
|---|---|
| Calories | 420 kcal |
| Protein | 6 g |
| Carbohydrates | 28 g |
| Fat | 30 g |
| Sugar | 22 g |
Values vary depending on ingredients and portion size.
Why No-Bake Cheesecakes Are Perfect for Any Occasion
No-bake cheesecakes have become incredibly popular for good reason. They offer a perfect solution for anyone looking to make a show-stopping dessert without the stress of baking.
They’re ideal for:
-
Summer desserts when you don’t want to heat the oven
-
Quick entertaining recipes
-
Birthdays and holidays
-
Beginner bakers who want foolproof results
Their creamy texture and versatility make them adaptable to any flavor combination — from citrus and chocolate to berry and caramel.
Serving and Presentation Tips
To elevate your cheesecake and make it look bakery-perfect:
-
Serve on a marble or white cake stand for a clean, elegant look.
-
Add a drizzle of fruit sauce right before serving.
-
Use a thin layer of mirror glaze for a professional finish.
-
Decorate with edible flowers for a romantic presentation.
-
Slice evenly with a sharp, hot knife for clean edges.
White Chocolate: The Star Ingredient
White chocolate often gets overlooked compared to dark or milk chocolate, but it brings a unique character to this cheesecake.
It adds:
-
Creaminess: Thanks to cocoa butter, it melts smoothly into the filling.
-
Sweetness: Balances the tangy cream cheese flavor.
-
Aesthetic appeal: Gives a bright, ivory hue that pairs beautifully with fruits and toppings.
For best results, choose a white chocolate with at least 28% cocoa butter and minimal additives.
Making it Ahead for Events
This cheesecake is the perfect make-ahead dessert. You can prepare it one or two days in advance and simply decorate it right before serving. In fact, the flavor and texture improve after 24 hours in the fridge, making it ideal for busy schedules or special occasions.
If you’re hosting:
-
Make the crust and filling the day before.
-
Refrigerate overnight.
-
Garnish just before guests arrive for a fresh, glossy finish.
Troubleshooting: What If It Doesn’t Set?
If your cheesecake turns out too soft, here are a few possible reasons and solutions:
-
Problem: The white chocolate was too warm when mixed.
Fix: Let it cool next time before adding. -
Problem: The cream was under-whipped.
Fix: Whip until soft peaks form before folding. -
Problem: It didn’t chill long enough.
Fix: Refrigerate for at least 8 hours or overnight. -
Problem: Room temperature too warm.
Fix: Store it in the coldest part of the fridge.
Expert Tip: Add Gelatin for Extra Stability
If you live in a warm climate or plan to serve the cheesecake outdoors, you can stabilize the filling with gelatin.
To do this:
-
Dissolve 1 teaspoon powdered gelatin in 2 tablespoons cold water.
-
Let it bloom for 5 minutes, then heat gently until melted.
-
Stir into the cream cheese mixture before folding in whipped cream.
This ensures your cheesecake stays firm and sliceable even in warmer temperatures.
Final Thoughts
A No-Bake White Chocolate Cheesecake is proof that luxurious desserts don’t have to be complicated. With minimal effort and no baking, you can create a smooth, creamy, and visually stunning dessert that delights everyone at the table.