There is something truly magical about a dessert that combines a delicate, crispy shell, a smooth and creamy filling, and a burst of fresh fruit in every bite. These Crispy Purple Lace Dessert Cups are beautiful individual treats that look like they came straight from a luxury pastry shop.
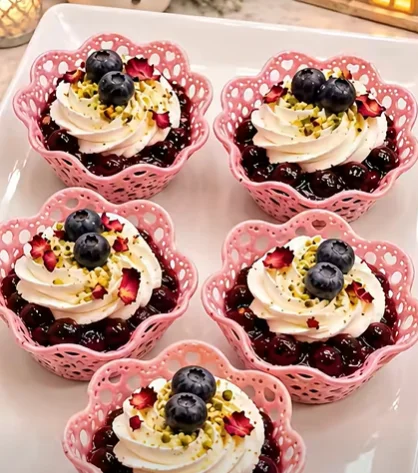
Each dessert features a handmade edible lace cup, filled with a glossy mixed-berry topping, a generous swirl of vanilla cream, and finished with fresh blueberries, crushed pistachios, and delicate dried rose petals.
The best part? You can make every component at home, including the decorative crispy lace cups. This recipe walks you through the entire process, from preparing the lace batter to assembling the finished desserts.
Recipe Overview
-
Preparation Time: 30 minutes
-
Cooking Time: 20 minutes
-
Cooling Time: 30 minutes
-
Total Time: Approximately 1 hour 20 minutes
-
Servings: 5 dessert cups
-
Difficulty: Intermediate
-
Category: Dessert
-
Cuisine: Modern European-Inspired
Part 1: Ingredients and Homemade Lace Cups
Ingredients
For the Crispy Pink-Purple Lace Cups
-
60 ml water
-
25 g all-purpose flour
-
50 ml neutral vegetable oil
-
1 tablespoon powdered sugar
-
1 teaspoon cornstarch
-
2–3 drops pink or purple food coloring
-
A small pinch of salt
For the Creamy Vanilla Filling
-
250 ml heavy whipping cream, cold
-
150 g mascarpone cheese
-
50 g powdered sugar
-
1 teaspoon vanilla extract
-
1 teaspoon lemon zest (optional)
For the Mixed Berry Filling
-
150 g fresh or frozen blueberries
-
100 g blackberries
-
80 g raspberries
-
60 g granulated sugar
-
1 tablespoon lemon juice
-
1 teaspoon cornstarch
-
2 tablespoons water
For Decoration
-
10–15 fresh blueberries
-
3 tablespoons finely chopped pistachios
-
1 tablespoon food-grade dried rose petals
-
A little powdered sugar (optional)
Step 1: Prepare the Crispy Lace Batter
The lace cups are the most distinctive element of this dessert. Their delicate, perforated appearance is created using a special batter containing water, flour, and oil.
When the batter hits a hot pan, the water begins to evaporate, leaving behind tiny holes that create the beautiful lace pattern.
Start by pouring the water into a mixing bowl. Add the flour, cornstarch, powdered sugar, and salt.
Whisk until the dry ingredients are fully incorporated.
Next, slowly add the vegetable oil while whisking continuously.
Add a few drops of pink or purple food coloring until you achieve your desired shade.
The mixture should be very thin and runny, almost like colored milk. This consistency is essential for creating the characteristic lace effect.
Whisk again immediately before cooking, as the oil and water naturally separate.
Step 2: Cook the Lace Tuiles
Place a nonstick frying pan over medium heat.
Allow it to warm up before adding the batter.
Pour approximately 2 tablespoons of lace batter into the center of the pan.
The mixture will immediately begin to bubble and spread, forming a circular pattern with many tiny holes.
Do not stir or touch the batter while it cooks.
As the water evaporates, the bubbling will gradually decrease and the lace will become firmer.
Cook for approximately 2–4 minutes, depending on your pan and heat level.
The lace is ready when:
-
Most of the bubbling has stopped.
-
The surface looks dry rather than wet.
-
The edges begin to lift slightly.
-
The lace can be carefully removed without tearing.
Using a thin spatula, gently lift the lace from the pan.
Transfer it to a paper towel for a few seconds to absorb excess oil.
Important: The lace is fragile, especially while hot. Work carefully and avoid flipping it unnecessarily.
Step 3: Shape the Lace into Beautiful Flower Cups
This is the secret to creating the decorative edible bowls.
While the lace is still warm and flexible, carefully place it over a small inverted bowl or gently press it into a silicone muffin mold.
Use your fingers or a second small mold to guide the lace into a flower-like cup shape.
Create soft, ruffled edges to resemble flower petals.
Hold the shape briefly until it begins to firm up.
Allow the cup to cool completely before removing it from the mold.
Repeat until you have five decorative lace cups.
Once cooled, the cups should be delicate, crispy, and able to hold their shape.
Pastry tip: Lace made with this type of batter can be fragile and moisture-sensitive. For better support, make the cups slightly thicker around the base, and use a dry, shallow mold. If a lace sheet becomes too brittle to shape, try molding the next one sooner after removing it from the pan.
For the prettiest presentation, aim for cups approximately 8–10 cm wide.
How to Keep the Lace Cups Crispy
Moisture is the biggest enemy of crispy lace.
Store the cooled, empty cups in an airtight container at room temperature until you are ready to assemble the desserts.
Do not refrigerate the empty lace cups, because condensation may soften them.
For best results, prepare the cream and fruit separately and assemble the desserts shortly before serving.
Part 2: Prepare the Filling and Assemble the Dessert
Step 4: Make the Glossy Mixed Berry Filling
Place the blueberries, blackberries, raspberries, and granulated sugar in a small saucepan.
Add the lemon juice and cook over medium-low heat.
Stir gently as the berries begin releasing their natural juices.
After approximately 4–5 minutes, the fruit should soften and create a rich, colorful syrup.
In a separate small bowl, mix the cornstarch with the water until smooth.
Pour this mixture into the saucepan.
Continue stirring for another 1–2 minutes until the berry sauce becomes glossy and lightly thickened.
You want the sauce to be thick enough to hold the fruit together without becoming overly sticky or gelatinous.
Remove the saucepan from the heat.
Allow the berry mixture to cool completely before using it.
Warm fruit filling can melt the vanilla cream and soften the delicate lace cups, so cooling is essential.
For a more luxurious texture, leave some blueberries and blackberries whole rather than crushing all the fruit.
Step 5: Prepare the Smooth Vanilla Mascarpone Cream
The cream filling should be rich, smooth, and stable enough to hold an elegant piped swirl.
Place the cold mascarpone cheese in a mixing bowl.
Add the powdered sugar and vanilla extract.
Mix briefly until smooth.
In another bowl, whip the cold heavy cream until it forms soft peaks.
Gradually fold the whipped cream into the mascarpone mixture using a spatula.
Continue folding gently until the mixture is smooth, fluffy, and thick enough to hold its shape.
Add the optional lemon zest for a refreshing citrus note.
Avoid overmixing, which can make the cream grainy or cause it to lose its light texture.
Transfer the finished cream into a piping bag fitted with a large star-shaped nozzle.
Refrigerate until ready to assemble.
Step 6: Assemble the Crispy Lace Dessert Cups
Now comes the most enjoyable part: bringing all the components together.
Place the five completely cooled lace cups on a large white serving plate.
For extra stability, you may position each cup inside a shallow decorative dessert holder.
First Layer: Mixed Berry Filling
Spoon 1–2 tablespoons of cooled mixed berry filling into each cup.
Spread the berries gently across the bottom.
Make sure the fruit mixture is thick rather than watery.
Avoid overfilling, as the cream will take up additional space.
Second Layer: Vanilla Cream
Hold the piping bag vertically above the center of each cup.
Begin piping the cream in a circular motion, starting from the outside and moving inward.
Gradually build a beautiful spiral.
Finish with a small peak in the center.
The piped cream should rise above the berry filling, creating an elegant contrast between the deep purple fruit and the soft white cream.
Step 7: Add the Final Decorations
To achieve the luxurious appearance shown in the photo, carefully decorate each cup.
Place two or three fresh blueberries on top of the cream.
Sprinkle finely chopped pistachios across the surface.
Add a few small pieces of food-grade dried rose petals.
The combination of colors creates a beautiful contrast:
-
Pink-purple lace: Delicate, crispy, and decorative.
-
Deep purple berries: Fruity, glossy, and slightly tangy.
-
White vanilla cream: Smooth, rich, and elegant.
-
Green pistachios: Crunchy and lightly nutty.
-
Pink rose petals: Floral and sophisticated.
For an extra elegant finish, dust lightly with powdered sugar immediately before serving, if desired.
Step 8: Serve Immediately
These desserts are at their best when freshly assembled.
The lace cups remain crispy, the cream stays beautifully piped, and the fruit provides a refreshing contrast.
Serve them on a white ceramic platter to highlight their delicate colors and intricate shape.
They are perfect for birthday celebrations, romantic dinners, afternoon tea, baby showers, weddings, and festive dessert tables.
Expert Tips for Perfect Crispy Lace Dessert Cups
1. Use a Good Nonstick Pan
A high-quality nonstick pan is essential for cooking the lace batter successfully. A stainless-steel pan may cause the delicate mixture to stick and tear.
2. Keep the Batter Thin
A thick batter will create something closer to a pancake rather than delicate lace.
If the batter seems too thick, add a teaspoon of water and whisk again.
3. Control the Heat Carefully
Excessive heat can burn the lace before the water has evaporated.
Medium heat is usually ideal, although every stove behaves differently.
4. Shape the Lace While Warm
The lace becomes brittle as it cools. Shape each piece as soon as it is firm enough to lift but still flexible.
If your lace breaks during shaping, reduce the cooking time slightly or use a shallower mold.
5. Keep All Fillings Cool
Never add warm berries to the cream or lace cups.
Warm fillings can melt the cream and destroy the crispy texture.
6. Assemble at the Last Minute
For the best texture, assemble the dessert no more than 10–15 minutes before serving.
This helps prevent the moisture in the fruit and cream from softening the lace.
Delicious Variations
Strawberry Vanilla Lace Cups: Replace the mixed berries with chopped strawberries and strawberry compote.
Chocolate Raspberry Lace Cups: Add a little melted and cooled white chocolate to the mascarpone cream and use a raspberry filling.
Lemon Blueberry Lace Cups: Add fresh lemon zest to the cream and use only blueberries in the fruit layer.
Mango Passion Fruit Lace Cups: Replace the berries with thick mango compote and passion fruit pulp for a tropical dessert.
Pistachio Cream Lace Cups: Mix a little pistachio paste into the mascarpone filling and decorate with extra crushed pistachios.
Frequently Asked Questions
Can I Make the Lace Cups Ahead of Time?
Yes. Prepare the empty lace cups several hours ahead or the day before, provided they remain completely dry and are stored in an airtight container.
Because the lace is thin and delicate, protect the cups from pressure and humidity.
Can I Use Frozen Berries?
Absolutely. Frozen berries are excellent for the fruit filling.
Cook them directly from frozen and allow additional time for the excess liquid to evaporate before thickening the sauce.
Can I Make the Cream Without Mascarpone?
Yes. You can replace mascarpone with full-fat cream cheese, although the flavor will be slightly tangier.
For a lighter version, use sweetened whipped cream stabilized with a suitable stabilizer.
Why Are My Lace Cups Not Crispy?
This usually happens when too much moisture remains in the batter or when the lace has not cooked long enough.
Allow more water to evaporate during cooking, and make sure the cups cool completely in a dry environment.
If the lace becomes soft after filling, the moisture from the cream or fruit is likely responsible.
Are the Pink Decorative Cups Edible?
Yes, when made with the lace batter described in this recipe. The finished lace is an edible, delicate tuile.
However, the pink lace-like holders in the reference photo could also be decorative serving cups. The exact material cannot be confirmed from the image alone. This recipe provides a homemade edible interpretation, so remove any non-edible holders before eating.
Storage Instructions
The individual components can be prepared in advance, but they should be stored separately.
Keep the mascarpone cream refrigerated in an airtight container for up to 2 days.
Store the cooled berry filling in the refrigerator for up to 3 days.
Keep the empty crispy lace cups in an airtight container at room temperature for up to 1 day, preferably in a cool, dry place.
Once assembled, enjoy the desserts as soon as possible. Although they can be refrigerated briefly for food safety, the lace will gradually lose its crispiness.
Final Thoughts
These Crispy Purple Lace Dessert Cups combine impressive presentation with wonderful flavors and textures.
The delicate homemade lace creates an elegant floral shape, while the sweet-tart berry filling adds rich color and freshness. A generous swirl of mascarpone vanilla cream brings everything together, and the finishing touches of blueberries, pistachios, and dried rose petals make every dessert look special.
The key to success is preparing each component carefully, keeping the fruit and cream cold, and assembling the cups shortly before serving.
Whether you are preparing a special dessert for guests or simply want to experiment with beautiful pastry techniques, these colorful lace dessert cups are a delightful way to turn simple ingredients into a memorable treat.