There’s something magical about the aroma of sugar cookies baking in the oven. That sweet, buttery scent instantly brings comfort, joy, and nostalgia. But as much as we love classic sugar cookies, rolling out the dough, cutting shapes, and decorating each one can be time-consuming.
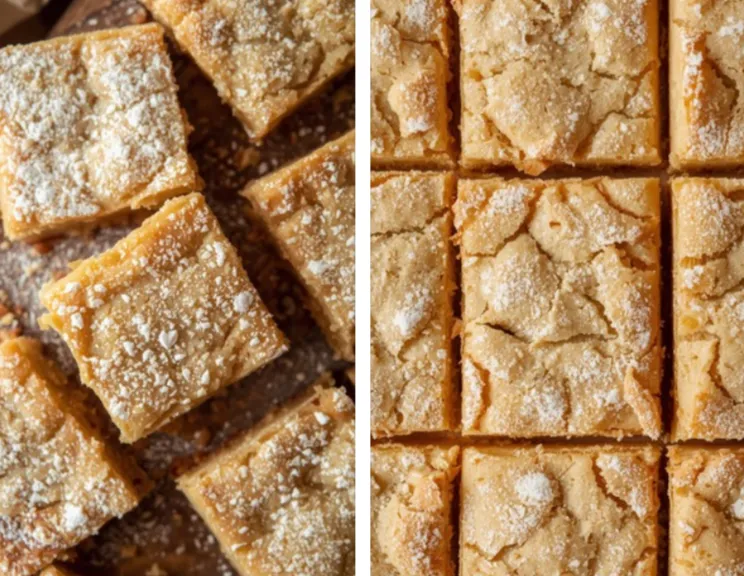
That’s where Sugar Cookie Bars come in — all the flavor and tenderness of traditional sugar cookies, but with half the effort. These bars are soft, chewy, buttery, and topped with a luscious layer of frosting that melts in your mouth. Whether you’re baking for a crowd, planning a festive dessert table, or simply craving something sweet, these bars are your ticket to dessert heaven.
In this post, we’ll explore everything you need to know about making the perfect Sugar Cookie Bars—from the ingredients and baking process to expert tips, flavor variations, and storage methods. Plus, you’ll discover how to decorate them beautifully for any season or celebration!
Why You’ll Love These Sugar Cookie Bars
Before we dive into the recipe, let’s talk about why these cookie bars are worth every bite:
-
Effortless Baking: No rolling pins, cookie cutters, or chilling time needed—just mix, press, bake, and frost.
-
Perfect Texture: Soft, buttery, and melt-in-your-mouth tender with just the right amount of chew.
-
Versatile for Every Occasion: Ideal for birthdays, Christmas, Easter, Valentine’s Day, or any casual get-together.
-
Crowd-Pleaser: Makes enough bars for a party and cuts cleanly into perfect squares.
-
Customizable: Change up the frosting colors, add sprinkles, or layer with fruit for seasonal flair.
If you’ve ever loved the taste of a bakery sugar cookie but wanted a quicker, foolproof way to get it—this recipe delivers exactly that.
Ingredients You’ll Need
Here’s a breakdown of what makes these bars irresistibly delicious:
For the Sugar Cookie Base:
-
2 ½ cups all-purpose flour: Provides structure while keeping the texture light.
-
½ teaspoon baking powder: Helps the bars rise slightly without becoming cakey.
-
¼ teaspoon salt: Balances sweetness and enhances flavor.
-
¾ cup (170g) unsalted butter, softened: The backbone of flavor and tenderness.
-
1 cup granulated sugar: Adds sweetness and golden edges.
-
1 large egg + 1 egg yolk: Adds richness and chewiness.
-
2 teaspoons pure vanilla extract: Adds warmth and that signature sugar-cookie aroma.
-
½ teaspoon almond extract (optional): For a subtle bakery-style flavor.
For the Frosting:
-
½ cup (115g) unsalted butter, softened
-
2 ½ cups powdered sugar
-
2 tablespoons heavy cream or milk
-
1 teaspoon vanilla extract
-
A pinch of salt
-
Food coloring (optional)
-
Sprinkles for decoration
Step-by-Step Instructions
Step 1: Prepare Your Pan
Preheat the oven to 350°F (177°C). Line a 9×13-inch baking pan with parchment paper, leaving a slight overhang for easy removal. Lightly grease the sides if needed.
Step 2: Mix Dry Ingredients
In a medium bowl, whisk together the flour, baking powder, and salt. Set aside.
Step 3: Cream Butter and Sugar
In a large bowl (or stand mixer), beat the butter and sugar together on medium-high speed until light and fluffy—about 2–3 minutes. This step is crucial for that soft, airy texture.
Step 4: Add Wet Ingredients
Add the egg, egg yolk, vanilla extract, and almond extract (if using). Mix until combined.
Step 5: Combine Wet and Dry
Gradually add the dry mixture to the wet mixture. Mix on low speed until just combined. Do not overmix—you want a soft, thick dough.
Step 6: Press and Bake
Press the dough evenly into the prepared pan. Smooth the top with an offset spatula or the back of a spoon.
Bake for 18–22 minutes, or until the edges are lightly golden and the center looks just set.
Avoid overbaking—these bars should be soft and chewy, not dry.
Step 7: Cool Completely
Allow the bars to cool completely in the pan before frosting. This helps the frosting spread smoothly and prevents melting.
Step 8: Make the Frosting
Beat the butter until creamy. Gradually add powdered sugar, alternating with heavy cream, until smooth and fluffy. Mix in vanilla and a pinch of salt. Adjust consistency—add more sugar for thickness or cream for softness.
Step 9: Frost and Decorate
Spread the frosting evenly over the cooled bars. Add sprinkles or seasonal decorations for flair.
Cut into squares or rectangles using a sharp knife (clean between cuts for perfect edges).
Pro Tips for Perfect Sugar Cookie Bars
-
Use room-temperature butter and eggs — it ensures even mixing and a soft texture.
-
Don’t overbake — the center should look just barely set; it continues cooking as it cools.
-
Frost only when cool — warm bars will cause frosting to melt.
-
Customize for holidays — pastel frosting for Easter, red & green sprinkles for Christmas, pink for Valentine’s Day.
-
Use parchment paper — it makes lifting and cutting super easy.
-
Chill before cutting — for perfectly clean, bakery-style squares.
Flavor Variations You’ll Love
Want to give your bars a twist? Try these creative ideas:
-
Lemon Sugar Cookie Bars: Add 1 tablespoon lemon zest and swap vanilla for lemon extract.
-
Funfetti Bars: Stir in ½ cup rainbow sprinkles into the dough before baking.
-
Chocolate-Dipped Bars: Once cut, dip half of each bar in melted chocolate and let harden.
-
Strawberry Frosted Bars: Mix freeze-dried strawberry powder into the frosting.
-
Christmas Edition: Use peppermint extract in the frosting and top with crushed candy canes.
-
Almond Bliss Bars: Add sliced almonds and almond extract for a nutty twist.
Occasions to Serve Sugar Cookie Bars
These bars are so versatile that they fit nearly every event imaginable:
-
Christmas dessert tables
-
Easter brunch spreads
-
Birthday parties
-
Bake sales or potlucks
-
Baby showers or bridal showers
-
After-school treats
-
Picnics and BBQs
-
Valentine’s Day gifts
Their simplicity and universal appeal make them the perfect go-to dessert all year round.
Storage & Freezing Instructions
Room Temperature:
Store in an airtight container for up to 3 days. Keep layers separated with parchment paper.
Refrigerator:
Frosted bars last up to 5 days in the fridge. Let them sit at room temperature for 20 minutes before serving.
Freezer:
Wrap unfrosted bars tightly and freeze for up to 2 months. Thaw, frost, and enjoy.
You can also freeze individually wrapped frosted bars (just avoid stacking to prevent smearing).
Pairing Ideas
Enjoy your sugar cookie bars with:
-
A warm cup of coffee or latte
-
Hot cocoa topped with whipped cream
-
Vanilla ice cream for a decadent treat
-
Strawberry milkshakes for a fun combo
-
Lemonade in the summer for a refreshing contrast
Decorating Inspiration for Every Season
| Occasion | Frosting Color | Decorations |
|---|---|---|
| Christmas | Red & Green | Holiday sprinkles or edible glitter |
| Valentine’s Day | Pink | Heart-shaped sprinkles |
| Easter | Pastel shades | Mini eggs or pastel confetti |
| Halloween | Orange & Black | Candy eyeballs, spooky sprinkles |
| 4th of July | Red, White & Blue | Star sprinkles |
| Birthday | Rainbow | Funfetti or edible gold dust |
Each season gives you the chance to make these cookie bars a fresh, festive highlight.
Common Questions (FAQ)
1. Can I double the recipe?
Absolutely! For a crowd, double the recipe and bake in a half-sheet pan. Adjust baking time to around 25 minutes.
2. Can I skip the frosting?
Yes—but the frosting really completes the flavor and texture balance. If skipping, sprinkle sugar over the dough before baking.
3. Can I make them gluten-free?
Use a 1:1 gluten-free flour blend. The texture stays soft and buttery.
4. Can I make these ahead?
Yes! Bake the bars one day ahead and frost the next day for easy event prep.
5. What’s the best way to cut clean squares?
Use a long, sharp knife and wipe clean between each cut. Chill before slicing for sharp edges.
Why These Bars Rank High in Baking Popularity
Sugar Cookie Bars trend consistently on Pinterest and Google searches because:
-
They’re simple (less than 30 minutes prep).
-
They’re aesthetic (colorful, photo-friendly, perfect for Pinterest boards).
-
They’re customizable (any color, any occasion).
-
And most importantly—they deliver that classic sugar cookie taste in a modern, convenient form.
Final Thoughts:
Sugar Cookie Bars are proof that simplicity can be extraordinary. With minimal effort, you get a dessert that’s buttery, soft, and beautiful enough for any celebration. Whether you’re baking for holidays, birthdays, or just craving something sweet on a Sunday afternoon—this recipe guarantees satisfaction.
