
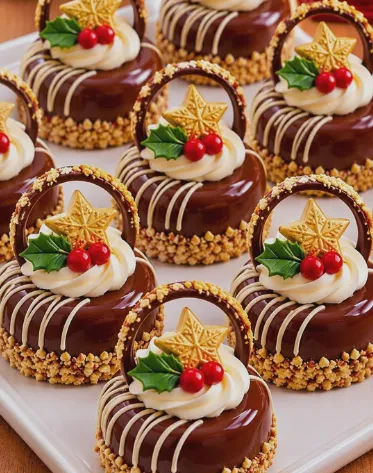
Christmas is the perfect time to prepare something special, and these Christmas Chocolate Hazelnut Mini Cakes are a wonderful addition to any holiday dessert table. With their soft chocolate sponge, rich chocolate ganache, crunchy hazelnut coating, and elegant festive decorations, these individual cakes look as beautiful as they taste.
Each mini cake combines a moist chocolate base with a smooth, creamy topping and a delicious nutty crunch. The combination of chocolate and hazelnuts creates a luxurious flavor, while the golden stars, red berries, and chocolate decorations give these little desserts a charming Christmas appearance.
Whether you’re preparing a festive family dinner, hosting a Christmas party, or looking for an impressive homemade dessert, these mini cakes are sure to delight your guests.
Recipe Information
-
Preparation time: 35 minutes
-
Baking time: 18–22 minutes
-
Cooling and chilling time: 1–2 hours
-
Total time: Approximately 2 hours 30 minutes
-
Servings: 8–10 mini cakes
-
Difficulty: Intermediate
Part 1: Ingredients
For the Chocolate Sponge Cake
-
150 g all-purpose flour
-
120 g granulated sugar
-
3 large eggs
-
30 g unsweetened cocoa powder
-
100 ml milk
-
80 ml vegetable oil
-
1 teaspoon baking powder
-
1 teaspoon vanilla extract
-
A pinch of salt
For the Chocolate Hazelnut Filling
-
150 g milk chocolate
-
100 g hazelnut spread
-
100 ml heavy whipping cream
-
40 g finely chopped toasted hazelnuts
For the Chocolate Ganache Coating
-
200 g dark or milk chocolate
-
150 ml heavy whipping cream
-
20 g unsalted butter
For the White Chocolate Drizzle
-
80 g white chocolate
-
1 teaspoon vegetable oil
For the Hazelnut Crunch
-
120 g roasted hazelnuts, finely chopped
-
30 g crushed wafer biscuits (optional)
For the Festive Decorations
-
150 ml cold heavy whipping cream
-
20 g powdered sugar
-
½ teaspoon vanilla extract
-
8–10 chocolate rings or arches
-
8–10 edible golden stars
-
Small red sugar pearls or edible berry decorations
-
Green fondant holly leaves
-
Extra chopped hazelnuts for decoration
Note: The chocolate sponge ingredients come from the visible recipe in the image. The filling, coatings, decorations, and quantities are suggested to recreate the pictured cakes, rather than confirmed ingredients from the original video.
Part 2: Step-by-Step Preparation
Step 1: Prepare the Baking Equipment
Start by preheating your oven to 175°C (350°F).
Lightly grease a mini cake mold or muffin tin with butter or vegetable oil. If you’re using a standard rectangular baking pan, line it with parchment paper to make removing the cake easier.
For a professional appearance, use individual round cake molds approximately 6–7 cm in diameter.
Make sure all your ingredients are at room temperature before beginning. This helps the cake batter mix evenly and creates a softer sponge.
Step 2: Prepare the Chocolate Sponge Batter
In a large mixing bowl, combine the eggs and granulated sugar.
Using an electric mixer, beat the mixture for approximately 3–4 minutes until it becomes pale, thick, and slightly fluffy.
Add the vegetable oil, milk, and vanilla extract. Mix gently until everything is well combined.
In a separate bowl, sift together the flour, cocoa powder, baking powder, and salt.
Gradually add the dry ingredients to the wet mixture, folding gently with a spatula.
Continue mixing just until the flour disappears and the batter becomes smooth.
Avoid overmixing, as this can make the sponge dense rather than soft and fluffy.
Step 3: Bake the Mini Chocolate Cakes
Divide the batter evenly between the prepared mini cake molds, filling each approximately two-thirds full.
Place the molds in the preheated oven and bake for 18–22 minutes, depending on their size.
To check whether the cakes are ready, insert a toothpick into the center of one cake.
If it comes out clean or with a few moist crumbs, the cakes are baked.
Remove them from the oven and allow them to cool in their molds for about 10 minutes.
Carefully transfer the cakes to a wire rack and let them cool completely.
If the tops are uneven, trim them gently with a sharp knife to create a flat surface.
Step 4: Make the Chocolate Hazelnut Filling
Place the milk chocolate in a heatproof bowl.
Heat the heavy cream in a small saucepan until it is hot but not boiling.
Pour the warm cream over the chocolate and allow it to sit for approximately 2 minutes.
Stir slowly until the chocolate melts completely and the mixture becomes smooth.
Add the hazelnut spread and mix until fully incorporated.
Finally, fold in the finely chopped toasted hazelnuts.
Refrigerate the filling for 20–30 minutes, stirring occasionally, until it thickens enough to spread.
The filling should be creamy but firm enough to hold its shape between the cake layers.
Step 5: Assemble the Mini Cakes
Once the chocolate sponges have cooled completely, carefully slice each cake horizontally into two layers.
Place the bottom layer on a clean work surface.
Spread approximately 1–2 tablespoons of chocolate hazelnut filling over the surface.
Gently position the second sponge layer on top.
Press lightly to secure the layers without squeezing out the filling.
Repeat with the remaining cakes.
Place the assembled mini cakes in the refrigerator for 20–30 minutes to firm up before glazing.
This chilling step makes them easier to coat and helps maintain their beautiful round shape.
Step 6: Prepare the Chocolate Ganache
Finely chop the dark or milk chocolate and transfer it to a heatproof bowl.
In a small saucepan, heat the heavy cream until it begins to steam.
Pour the hot cream over the chopped chocolate.
Allow it to rest for 2 minutes, then stir gently from the center outward until the chocolate is completely melted.
Add the unsalted butter and stir until the ganache becomes glossy and smooth.
Allow the ganache to cool slightly until it is thick enough to coat the cakes without running off too quickly.
The ideal texture is smooth, pourable, and slightly thick.
Step 7: Coat the Mini Cakes with Chocolate
Place the chilled mini cakes on a wire rack positioned over a baking tray.
Slowly pour the chocolate ganache over each cake, starting from the center and allowing it to flow naturally over the sides.
Use a small spatula if necessary to cover any exposed areas.
The goal is to create a smooth, glossy chocolate coating similar to the beautiful finish shown in the picture.
Allow the excess ganache to drip away.
Before the chocolate coating sets completely, gently press the chopped roasted hazelnuts around the bottom edge of each cake.
If desired, mix the hazelnuts with crushed wafer biscuits to add extra crunch.
Refrigerate the coated cakes for approximately 20 minutes until the ganache becomes firm.
Step 8: Add the White Chocolate Drizzle
Melt the white chocolate in a microwave-safe bowl using short 15-second intervals, stirring between each interval.
Alternatively, melt it gently over a double boiler.
Add the vegetable oil and stir until smooth.
Transfer the melted white chocolate to a small piping bag.
Cut a tiny opening at the tip.
Pipe thin, elegant lines across the top of each chocolate cake.
For the most attractive appearance, create slightly curved parallel lines rather than thick stripes.
Allow the white chocolate to set before adding the final decorations.
Step 9: Prepare the Whipped Cream Decoration
Pour the cold heavy whipping cream into a chilled mixing bowl.
Add the powdered sugar and vanilla extract.
Whip using an electric mixer until stiff peaks form.
The cream should be firm enough to maintain its shape when piped.
Transfer the whipped cream into a piping bag fitted with a large star nozzle.
Pipe a generous decorative swirl on top of each mini cake, slightly toward the back or center.
Keep the swirls consistent in size for a professional presentation.
Step 10: Create the Christmas Decorations
For the chocolate arches, melt approximately 100 g of additional dark chocolate if you’re making them yourself.
Pipe curved arches onto parchment paper, making each arch wide enough to stand over a mini cake.
Sprinkle finely chopped hazelnuts along the outer edge of each chocolate arch before the chocolate sets.
Allow the arches to harden completely in a cool place.
Carefully peel them away from the parchment paper.
Insert one chocolate arch gently into the whipped cream or secure it with a small amount of melted chocolate.
Place an edible golden star in front of the arch.
Add two or three red sugar pearls and small green fondant holly leaves beside the star.
These decorations create the festive Christmas look seen in the image.
Step 11: Chill Before Serving
Arrange the finished mini cakes on a serving tray.
Refrigerate them for at least 30 minutes before serving so the decorations and chocolate coating become stable.
For the best flavor and texture, remove the cakes from the refrigerator approximately 10–15 minutes before serving.
This allows the chocolate filling to soften slightly while the cakes remain beautifully structured.
Tips for Perfect Chocolate Hazelnut Mini Cakes
Use high-quality chocolate. The chocolate coating is one of the most important parts of this dessert. Good-quality chocolate creates a smoother texture and richer flavor.
Toast the hazelnuts. Roasting hazelnuts enhances their natural aroma and gives the cakes a deeper, nuttier taste.
Cool the sponge completely. Never add the filling while the cakes are warm, as the chocolate cream may melt and make the layers slide.
Chill between stages. Refrigerating the cakes before coating and decorating helps create a cleaner, more professional finish.
Keep the decorations lightweight. Use thin chocolate arches and small edible decorations so the whipped cream can support them.
Storage Instructions
Store the finished mini cakes in an airtight container in the refrigerator for up to 3 days.
Because the decorations contain fresh whipped cream, the cakes should remain refrigerated until shortly before serving.
For longer storage, the undecorated chocolate sponges can be frozen for up to 2 months. Wrap them individually in plastic wrap and place them in a freezer-safe container.
Thaw overnight in the refrigerator before filling and decorating.
Serving Suggestions
These Christmas Chocolate Hazelnut Mini Cakes look especially beautiful when arranged on a white ceramic serving platter.
For a festive presentation, decorate the surrounding table with pine branches, cinnamon sticks, Christmas ornaments, or warm fairy lights.
Serve the cakes with freshly brewed coffee, hot chocolate, cappuccino, or a glass of cold milk.
Their rich chocolate flavor and crunchy hazelnut coating make them a delicious dessert after a festive holiday meal.
Conclusion
Christmas Chocolate Hazelnut Mini Cakes are a wonderful combination of elegance, flavor, and festive charm.
With their moist chocolate sponge, creamy hazelnut filling, glossy chocolate coating, delicate white chocolate drizzle, and beautiful Christmas decorations, these individual desserts are guaranteed to become a highlight of your holiday table.
Although they look like something from a professional bakery, they can be prepared at home with simple ingredients and a little patience.
Make these beautiful chocolate hazelnut mini cakes for your next Christmas celebration and enjoy a rich, creamy, crunchy holiday treat that everyone will love!


